Jenkins Tutorial – Step by Step Guide
CONTINUOUS INTEGRATION
CI/CD stands for Continuous Integration and Continuous Delivery/Deployment. CI/CD Pipeline implementation is the backbone of the modern DevOps environment.
DevOps is a software development concept and revolves around the various phases like continuous development, continuous testing, continuous integration, continuous deployment and continuous monitoring throughout the life cycle.
Let us imagine a scenario where the entire source code of an application was built together and then deployed on test server for testing.
This approach has many issues, like:
- Developers have to wait for the coding to end, to see the testing output.
- If the test results show multiple bugs, it is difficult to locate them in the workspace and fix in time.
- It slows the software delivery process.
- Continuous feedback was missing due to which the quality of software went down.
- The whole process was manual which increases the risk of frequent failures.
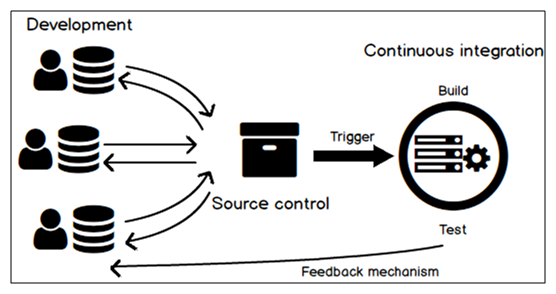
To rectify these issues, there was a dire need for a system to exist where developers can continuously trigger a build and test for every change they made in the source code. This is what CI is all about.
A Continuous Integration Pipeline consists of a set of tools designed to host, monitor, compile and test code, or code changes, like:
- Continuous Integration Server (Jenkins, Bamboo, CruiseControl, TeamCity etc)
- Source Control Tools (CVS, SVN, GIT, Mercurial, and others)
- Build tools (ANT, Maven, Gradle, Ivy and others)
- Automation testing frameworks (Selenium, TestComplete, UFT, and others)
Real-world case study of Continuous Integration
I am pretty sure you all have used Nokia phones at least once in your life. Nokia used to implement a procedure called Nightly builds. After several commits from various developers through the day, there was a software build each night. Since the software was built only once in a day, it was a huge task to isolate, identify, and fix the errors in a large code base.
Later, they adopted Continuous Integration approach. The software was built and tested immediately after a code commit. If the build failed, then the developers only needed to check that particular commit. This significantly reduced the time required to release new software.
CI Tools
There are several functions that a CI tool performs like deploying the build application on the test server, providing the concerned teams with the build and test results etc.
Let us discuss some of the popular CI tools available in the market.
1. Jenkins
Jenkins is a Java-based CI server. It has gone beyond the limits of a simple CI server and is popular in the market as an open-source automation server.
Key Features:
- Jenkins can work as an independent CI server, or a continuous delivery platform for virtually any of your projects
- Pre-built packages for Unix, Windows, and OS X ensures an easy installation process
- A web interface available for use for quick server configuration
- Deployable across a network of machines, improving performance of builds and tests
- Involvement of large community with leading software brands in development
- Free for public open source projected on GitHub
- It is simple to sign up, add a project, and begin testing
- Bilingual support so your code runs smooth across all versions
- Automated pull request verification
- Works with Email, Slack, HipChat and others for easy notifications
- Extended API and CMD tools for custom management
- Great support for Visual Studio; tool versioning, framework testing, code coverage, code analysis, all included without any external scripts
- Settings are reusable so duplication effort in code writing can be avoided, all because of anIntuitive foundation
- Comprehensive version control for structuring your project
- Detailed history reports for builds, failures, and any additional changes made
- You can first create an account, then, add a project, and start building. The platform grabs the custom settings from your code directly
- Integrates well with Maven, Gradle, and other top-notch build tools
- Flawless integration with AWS, Heroku, Google Cloud, and others
- Integrated directly into the GitLab workflow
- Add additional machines to scale your performance tests
- With CMD build scripts, you can program them in any language
- Custom version tests to check branches individually
- Manual deployment, and effortless rollback capabilities
- Local agents (run as part of the Bamboo server as its process)
- Remote agents (run on any other servers and computers)
- Use Bamboo with your favorite stack, including Docker, AWS, and S3; it works out of the box with your favorite coding language
- Custom deployment projects to archive the history of each of your release versions
- Fix critical bugs quickly using custom agents that can be assigned for immediate builds
- Detailed outline of your code history before you deploy, helping you understand the progress you’re making
- Compatible with Bitbucket and JIRA for a comprehensive CI experience
- With per-environment permissions, developers and QA can deploy to their own environments on demand while production stays locked down
- Custom build loop for build cycles
- JSP reporting for managing build results
- GUI interface to view output of builds
- Built-in development kit with a set of tools for code infrastructure automation
- Transfer your apps among cloud locations with ease
- Multi-manageable capabilities for managing cloud and physical servers
- Host your server API with Chef to provide a hardened layer of uptime guarantee
- Custom Puppet agents and consoles that consolidate your CI process
- Thousands of free-to-use modules to rapid development
- It gives a truly automated experience just like Git and Jenkins.
- Security principles based on compliance
- Puppet can manage nearly any IP-connected device
- Integrates with a variety of cloud providers
- Integrates with Jenkins and Travis
- Support for messaging through Slack, email, and more
- Cluster management
- Deployment management
Cost: Open Source
We will cover this tool in more detail in further sections.
2. Travis CI
Travis CI automates the software testing process and deployment of applications. It’s built as a platform that integrates with your GitHub projects so that you can start testing your code on the fly.
Key Features:
Cost: Free for open repositories, Enterprise for private
3. TeamCity
TeamCity is an intelligent CI server solution from Jetbrains, for
any size of software environment. As a CI/CD tool, TeamCity aims
to improve releases. Additionally, the tool provides the ability
to run parallel builds on different platforms and environments,
simultaneously.
TeamCity’s dashboard is browser-based and provides project
status and reporting information for users.
Key Features:
Cost: Free, Business Starting at $299
4. CircleCI
CircleCI provides a state of the art platform for integration and delivery, which has helped multiple teams across the globe to release their code through build automation, test automation, and a comprehensive deployment process.
Key Features:
Cost: Free, Premium Starting at $50
5. GitLab CI
GitLab is a fast growing code management platform. It provides many tools from a single dashboard, which aids in issue management, code views, continuous integration and deployment, all within a single dashboard. Right from the beginning till production stages, you get a bird’s-eye view of how your project is growing and maturing, with GitLab.
Key Features:
Cost: Free for Community Edition, Enterprise Starting at $16 per user
6. Bamboo
Bamboo is a continuous integration and continuous deployment
server developed by Atlassian. Bamboo ties automated builds,
tests, and releases together in a single workflow by
integrating with other Atlassian products such as JIRA,
Bitbucket, Stash, Hipchat and Confluence.
Bamboo uses the concepts of agents to perform all CI-CD
tasks including build, test and deploy. There are two types
of agents:
Key Features:
Cost: $10 for Small Teams; $800 for Growing Teams
7. CruiseControl
CruiseControl is an open-source framework built with Java that oversees your continuous build process. It provides a flexible web dashboard to view the details of your builds. Developers can extend their workflow beyond the basic functionality, using plugins.
Key Features:
Cost: Open Source
8. Chef
The main aim of Chef is to provide an automated environment for how your infrastructure is managed, deployed, and configured — regardless of the size of your network. Chef can be easily integrated with cloud services, physical servers, and hybrid solutions.
Key Features:
Cost: Open Source with Business plans available
9. Puppet
Puppet’s platform is built to manage the configs of Unix and Windows systems. As software, it’s an Open-Source config management tool. Puppet gives developers an option to deliver and operate their software regardless of its origin.
Key Features:
Cost: Free Trial, $3,000 (500 nodes) and up
10. Spinnaker
An open-source, multi-cloud continuous delivery platform for releasing rapid software changes with confidence, Spinnaker is a highly configurable, safe tool to speed development and leverages industry best practices out of the box.
Key Features:
Cost: Open Source
 Workshop on Certified DevOps
Foundation
Workshop on Certified DevOps
Foundation Workshop on Certified DevOps
Professional
Workshop on Certified DevOps
Professional Get DevOps
Certified
Get DevOps
CertifiedJENKINS
Our task is to automate the entire software development lifecycle on the devops mode/ automated mode – right from the time the development team gives us the code and commits it till the time we get it into production. For this, automation tools are required.
Jenkins plays a critical role in DevOps lifecycle. It has become the open source standard for managing the dev side of devops, from source code management to delivering code to production.
Jenkins is a CI server which is open source, and is written in Java. It supports the complete development lifecycle of software from building, testing, documenting the software, deploying
and other stages of a software development lifecycle.
Jenkins History
- In 2004, Kohsuke Kawaguchi created an automation server called Hudson that automated build and test tasks. He was a Java developer, working at SUN Microsystems, who was tired of building the code and fixing errors repetitively.
- In 2011, Oracle who owned Sun Microsystems had a dispute with Hudson open source community, so the forked Hudson and renamed it as Jenkins.
Jenkins Key Metrics
These facts about Jenkins make it far better than other Continuous Integration tools:
- Adoption: Jenkins is very popular and widely used, with more than 147,000 active installations and over 1 million users around the world.
- Plugins: Jenkins comes with approximately 1,000 plugins that allows it to integrate with most of the development, testing and deployment tools.
Let us compare before and after scenarios, and see how Jenkins has impacted the software development process:
| Before Jenkins | After Jenkins |
| The entire source code was built and then tested. Locating and fixing bugs in the event of build and test failure was difficult and time consuming, which in turn slows the software delivery process. | Every commit made in the source code is built and tested. So, instead of checking the entire source code developers only need to focus on a particular commit. This leads to frequent new software releases. |
| Developers have to wait for test results | Developers are aware of the test result of each code commit made on the run. |
| The whole process is manual | You only need to commit changes to the source code and Jenkins will automate the rest of the process for you. |
Let us understand a generic CI flow with Jenkins:
- First, a developer makes a code commit to the source code repository. In the meantime, the Jenkins server checks the repository at regular intervals for any updates/changes.
- The Jenkins server detects the recent changes and pulls them and prepares a new build.
- If the build fails, then the concerned team will be notified.
- If the build passes, then Jenkins deploys the build on the test server.
- Once testing completes, Jenkins generates a feedback and notifies the developers about the build and test results.
- It will continuously check the source code repository for source code changes the whole process repeats itself.
Jenkins Architecture
The single Jenkins server was not efficient enough to address the following scenarios:
- Sometimes you might need different environments to test your builds. This cannot be handled by a single Jenkins server.
- If larger projects get built on a regular basis then a single Jenkins server cannot handle the entire load.
To address the above situations, Jenkins distributed architecture came into the picture.
Jenkins Distributed Architecture
Jenkins uses a Master-Slave architecture to handle distributed builds. Master and Slave communicate with each other through the TCP/IP protocol.
Jenkins Master
Your main Jenkins server is the Master. The Master’s job is to:
- Schedule the build jobs.
- Dispatch builds to the slaves for the actual execution.
- Monitor the slaves.
- Recording and presenting the build results.
- It can execute build jobs directly, also.
Jenkins Slave
A Slave is a Java program that runs on a remote machine.
Following are the characteristics of Jenkins Slaves:
- It hears requests from the Jenkins Master instance.
- Slaves can run on a variety of operating systems.
- The job of a Slave is to follow instructions given by the Master, which includes executing build jobs dispatched by the Master.
- A project can be configured to run on a particular Slave machine always, or a particular type of Slave machine, or simply allow Jenkins to pick the next available Slave.
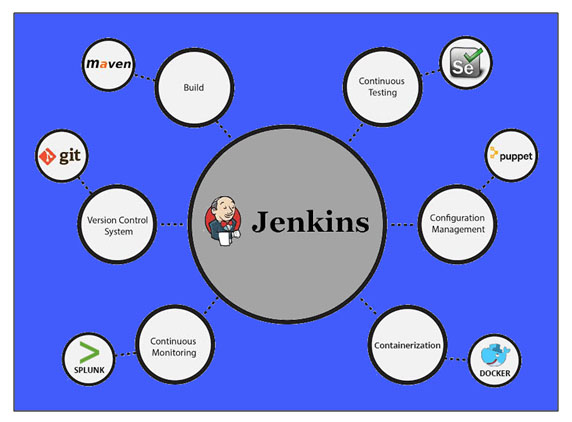
Jenkins – Importance in CI CD Pipeline
Jenkins provides us with various interfaces and tools in order to
automate the entire CICD process.
Let us understand through an example:
Suppose a company is using Chef or Puppet for deployment on AWS. Jenkins is not going to replace that, instead Jenkins will call Puppet to do it and it is the output of Puppet’s execution which is going to matter to Jenkins because it might decide to unroll the deployment and take further actions.
Jenkins acts as the workflow engine to manage this CI/CD pipeline, right from source until delivery. Many different tools may be called upon to perform different functions, at various
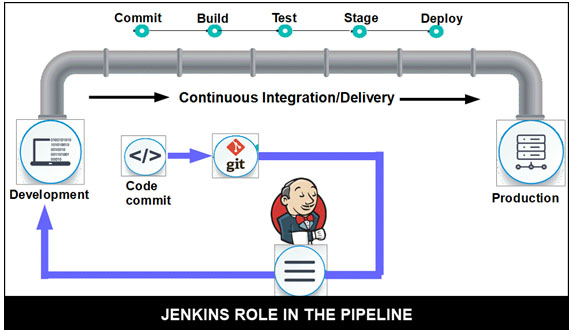
stages of the pipeline.
Suppose we have a Git repository where the development team will
commit the code. From Git, Jenkins pulls the code and moves it to
the commit phase, where the code is committed from all the branches.
Then Jenkins moves it into the build phase where code compilation
happens.
If it is Java code, we use build tools like Maven in Jenkins and
then compile that code, which we can be deployed to run a series of
tests. These test cases are overseen by Jenkins again.
Next, it moves on to the staging server for deployment using Docker.
After a series of Unit Tests or sanity test, it moves to the
production.
This is how the delivery phase is taken care by a tool called
Jenkins, which automates everything. For deployment, production
environment which is replicated using Docker.
Docker with Jenkins is having a huge impact on development teams.
BUILD TOOLS
Build tools automate the creation of executable applications from source code. Building includes compiling, linking and packaging the code into a usable or executable form.
Build automation is the act of scripting or automating a variety of tasks that software developers perform on a daily basis like:
- Downloading dependencies.
- Compiling source code into binary code.
- Packaging that binary code.
- Running tests.
- Deployment to production systems.
For small-sized projects, developers will often go for manual build process but the same is not practical for larger projects, where it is very hard to keep track of what needs to be built, in what sequence and what dependencies there are in the building process. Using build tools, the consistency of the build process is increased.
These are the three most popular build tools:
ANT
Apache Ant from the Apache Software Foundation, is a Java based build tool. Apache Ant’s build files are written in XML and they are open standard, portable and very easy to understand. A glimpse of how ANT build is run:

MAVEN
Maven is a Software project management tool.
Maven helps to manage the following:
- Builds
- Documentation
- Reporting
- Dependencies
- SCMs
- Releases
- Distribution
Features:
- A large growing repository of libraries.
- Consistent usage across all projects.
- Dependency management including automatic updating.
- Extensible – plugins can be written in Java or scripting languages.
- Immediate access to new features with minimal configuration changes.
- Simple project setup that follows best practices
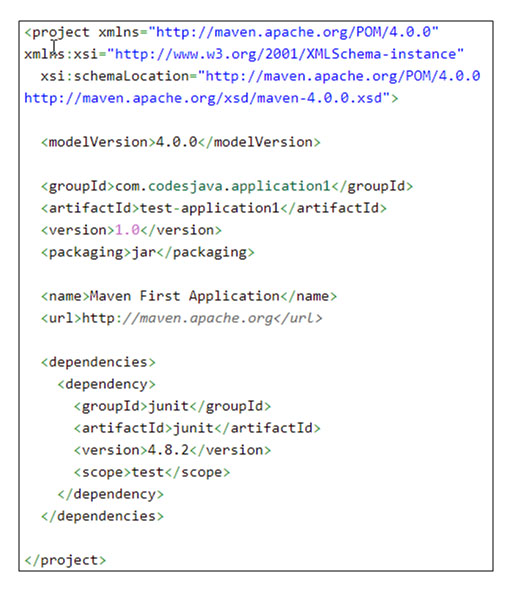
POM is an acronym for Project Object Model.
The pom.xml file contains project and configuration information for Maven to build the project such as dependencies, build directory, source directory, test source directory, plugin, goals etc.
A simple POM file:
Commonly used elements of POM.xml file:
| Element | Description |
|---|---|
| Project | Root element of pom.xml file. |
| modelVersion | Sub-element of project which specifies
the modelVersion. Value should be 4.0.0. |
| groupId | Sub-element of project which specifies the id of the project group. |
| artifactId | Sub-element of project which specifies the id of the project, generally refers to the name of the project. ArtifactId is used as a part of the JAR, WAR or EAR file produced while building the project. |
| version | Sub-element of project which specifies the version of the project. |
| packaging | Defines the packaging such as jar, war etc. |
| name | Defines the name of the maven project. |
| url | Defines the url of the project. |
| dependencies | Defines the dependencies of the project. |
| dependency | Defines a particular dependency of the project. Used inside dependencies element. |
| scope | Defines the scope for this maven project. The values can be compile, provided, runtime, test and system. |
| project, modelVersion, groupId, artifactId and version are required fields. | |
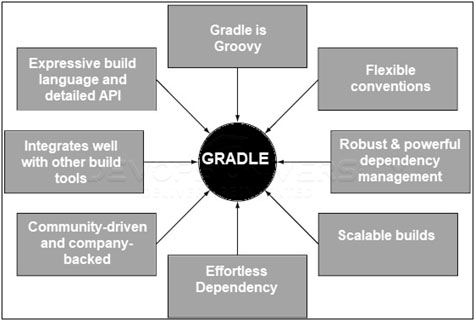
GRADLE
Gradle is built upon the concepts of Apache Ant and Apache Maven and is an open-source build automation system. It introduces a Groovy-based domain-specific language instead of the XML form used earlier for project configuration declaration.
Jenkins Features
Jenkins Plugins
Plugins in Jenkins are aids to enhance the functionality of a Jenkins environment to accommodate organization or user-specific requirements.
There are two methods for installing plugins in Jenkins:
- Installing it through your Jenkins dashboard
- Downloading the plugin from Jenkins website and installing it manually.
Stepwise Plugins Installation through dashboard.
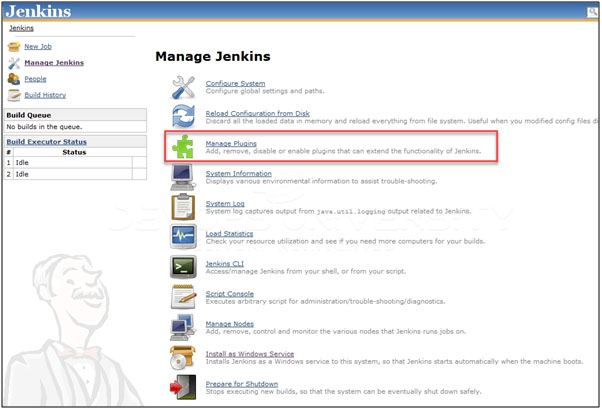
- Go to Manage Jenkins
- Click on the Manage Plugins option
- If you have already installed the plugin, it is shown under the installed tab.
- If you do not have the plugin previously installed, it shows up under the Available tab.
Now, let us install a commonly used Git Plugin:
- In the Available section, screen Search for “Git plugin”.
- Check the Git Plugin option and click on the button ‘Install without restart’
- Once all installations are complete, restart Jenkins by issue the following command in the browser. https://localhost:8080/jenkins/restart
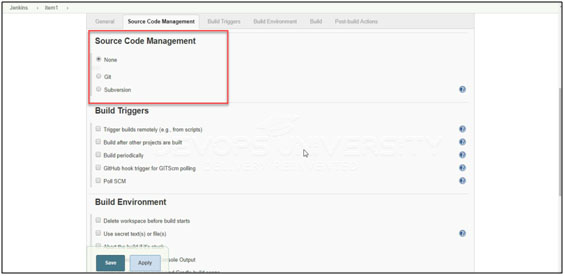
Once Jenkins is restarted, Git will be available as an option while configuring the jobs. To verify, click on New Item in the menu options for Jenkins. Then give a name to the job. Select the item type as ‘Freestyle project’. Then click the OK button.
On the next screen, in the Source code Management section, ‘Git’ can be seen as an option.
JENKINS MAVEN SETUP
Step 1: Downloading and Setting Up Maven
The official website for maven is https://maven.apache.org/. On clicking this link, you get the home page of the MAVEN official website as shown below.

While browsing to the site, go to the Files section and download the link to the Binary.zip file.
Once the file is downloaded, extract the files to the relevant application folder.
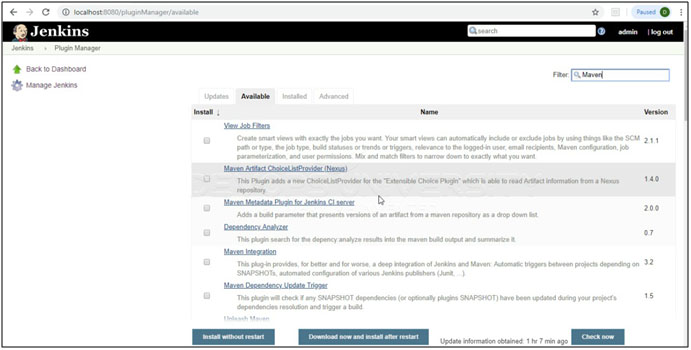
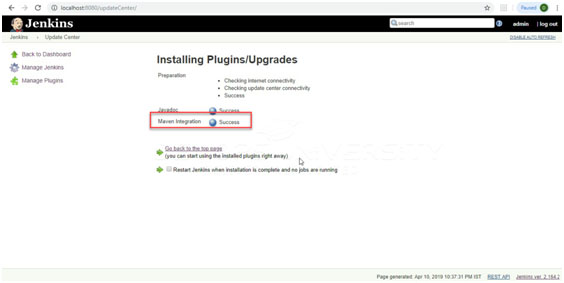
Step 2: Setting up Jenkins and Maven
Install the Maven Integration Plugin from Manage Jenkins section.
In the Jenkins dashboard (Home screen), click Manage Jenkins from the
left-hand side menu.
Then, click on ‘Configure System’ from the right hand side.
In the Configure system screen, scroll down till you see the Maven
section and then click on the ‘Add Maven’ button.
Uncheck the ‘Install automatically’ option.
Add any name for the setting and the location of the
MAVEN_HOME.
Then, click on the ‘Save’ button at the end of the screen.
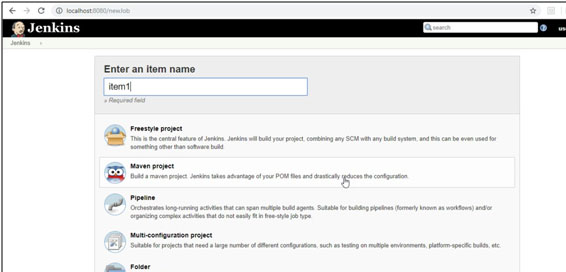
You can now create a job with the ‘Maven project’ option. In the
Jenkins dashboard, click the New Item option.
Roles
Usually in large organizations, there are multiple, separate teams to manage and run jobs in Jenkins, but managing this large group of users and assigning roles to them can prove troublesome.
By default, Jenkins comes with very basic user creation options. You can create multiple users but can only assign the same roles and privileges to them. This is not the ideal option, especially for a large organization.
The Role-based Authorization Strategy allows you to assign different roles and privileges to different users. You need to install the plugin in your Jenkins environment.
- In available section, screen Search for “role”.
- Select Role-based Authorization Strategy plugin
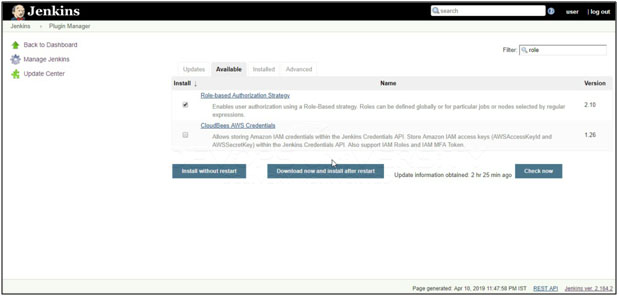
- Click on “Install without restart” (make sure you have an active internet connection)
- Once the plugin is installed, a “success” status will be displayed.
How to Create/Add a User
Step 1: Login to your Jenkins dashboard by visiting https://localhost:8080/
If you haven’t installed Jenkins in your local server, go to the appropriate URL and access your dashboard by using your login credentials.
Step 2: You will now see options to create new users and manage current users.
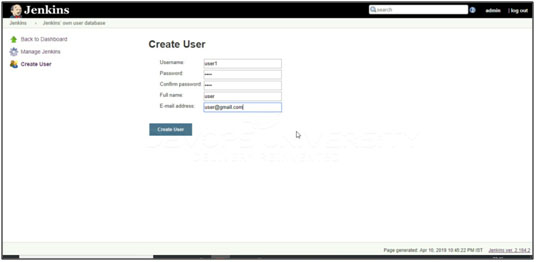
Step 3:
- Under Manage Jenkins, Click Create User
- Enter User details like password, name, email etc.
- Click Create User
Note that the Manage and Assign Roles option will only be visible if you’ve installed the role strategy plugin.
Step 2: Click on Manage Roles to add new roles based on your organization.
Step 3: To create a new role called “developer”
- Type “developer” under “role”.
- Click on “Add” to create a new role.
- Now, select the permissions you want to assign to the “Developer” role.
- Click Save
>
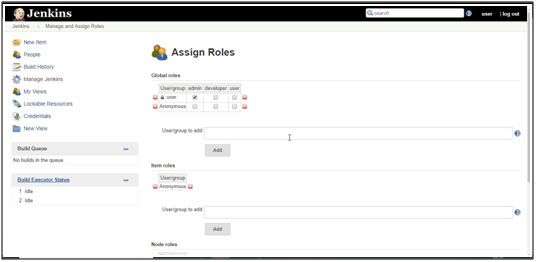
Assign a Role – Now that you have created roles, let us assign them to specific users.
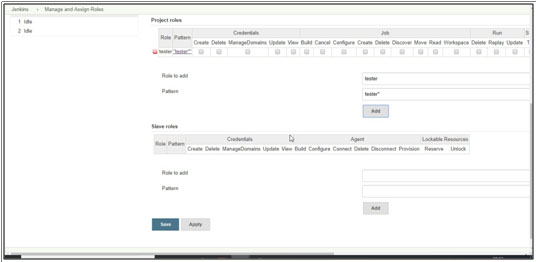
Step 1: Go to Manage Jenkins and select Manage and Assign Roles
Step 2: You can assign any role to any user, as per your need.
You can create project specific roles under Project Roles.
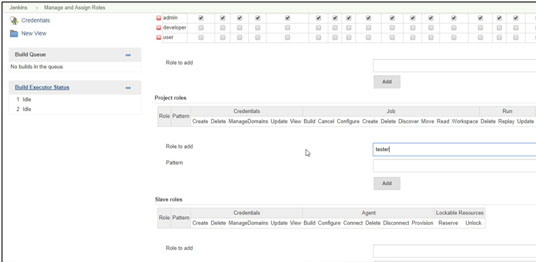
Step 3: In Manage and Assign Roles
- Enter a role as “tester”
- Add a pattern to this by adding tester.*, so that any username starting with “tester” will be assigned the project roles you specify.
- Click Add
- Select privileges
- Click Save
Jenkins Security
Jenkins gives you the feature to setup users along with their relevant permissions on a Jenkins instance. Jenkins gives you security configuration options as you would surely want to restrict and define access rights to users. For example: you would not like everyone to define jobs or other administrative tasks in Jenkins.
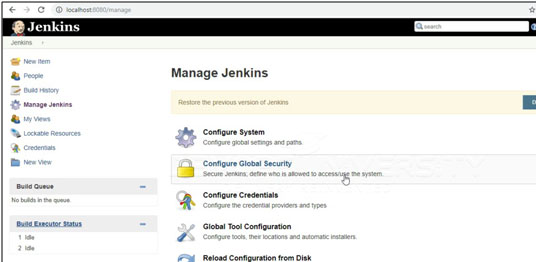
Follow these steps to configure security in Jenkins:
Step 1 − Click on Manage Jenkins and choose the ‘Configure Global Security’ option.
Step 2 − Click on Enable Security option. As an example, suppose we want Jenkins to maintain it is own database of users, so in the Security Realm, choose the option of ‘Jenkins’ own user database’.
By default you would like to have a central administrator who defines users in the system, so ensure the ‘Allow users to sign up’ option is unselected. Leave the rest of the values as default and click the Save button.
Step 3 − You will be prompted to add your first user. As an example, we are setting up an admin user for the system.
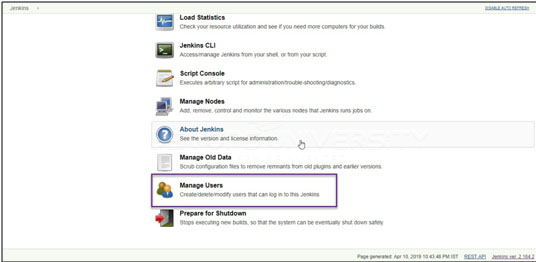
Step 4 − It’s now time to setup your users in the system. When you go to Manage Jenkins, and scroll down, you will see a ‘Manage Users’ option. Click this option.
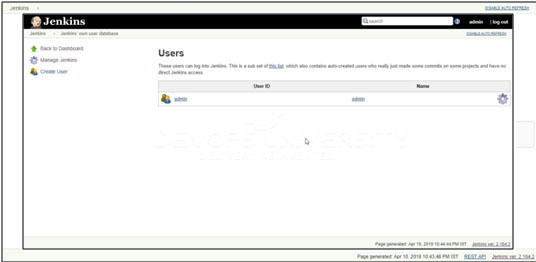
Step 5 − Just like you defined your admin user, start creating other users for the system. As an example, we are just creating another user called ‘user’.
Step 6 − Now it’s time to setup your authorizations, basically who
has access to what. Go to Manage Jenkins → Configure Global
Security.
Now in the Authorization section, click on ‘Matrix based
security’
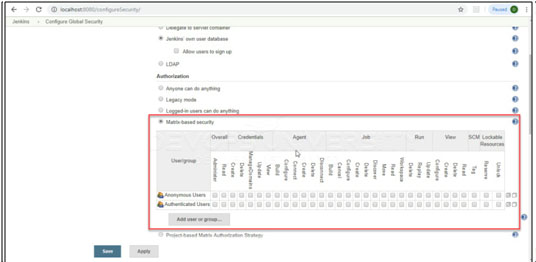
Step 7 − If you don’t see the user in the user group list, enter the user name and add it to the list. Then give the appropriate permissions to the user.
Click on the Save button once you have defined the relevant authorizations.
Your Jenkins security is now setup.
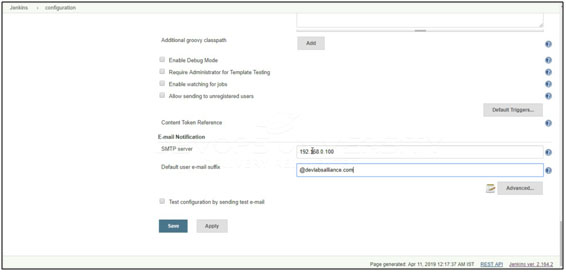
Email Configuration
Jenkins gives you an out of box facility to add an email notification for a build project.
Step 1 − Configuring an SMTP server. Go to Manage Jenkins → Configure System. Go to the Email notification section and enter the required SMTP server and user email-suffix details.
Step 2 − Configure the recipients in the Jenkins project – When you configure any Jenkins build project, right at the end is the ability to add recipients who would get email notifications for unstable or broken builds. Then click on the Save button.
Here are the details of each option −
- “Format” − This is the notification payload format which can either be JSON or XML.
- “Protocol” − protocol to use for sending notification messages, HTTP, TCP or UDP.
- “Event” − The job events that trigger notifications: Job Started, Job Completed, Job Finalized or All Events (the default option).
- “URL” − URL to send notifications to. It takes the form of “https://host” for HTTP protocol, and “host:port” for TCP and UDP protocols.
- “Timeout” − Timeout in milliseconds for sending notification request, 30 seconds by default.
Jenkins Build Jobs
Let us look at the types of build jobs available in Jenkins.
- Freestyle job:
Freestyle build jobs are the general-purpose build jobs with maximum flexibility and multiple configuration options. They can be used for any project type. Setting up these jobs is pretty easy. - Multiconfiguration Job:
With the “multi-configuration project” (also referred to as a “matrix project”), you run the same build job on different environments. This job is useful for testing an application in different environments, with different databases, or even on different build machines. - Monitor an External Job:
The “Monitor an external job” build job lets you keep an eye on non-interactive or backend processes, for example cron jobs. - Maven Project:
The Maven project is a build job especially designed for Maven projects.
Jenkins understands Maven POM files and project structures, and can use the information gathered from the POM file to minimize the setup work for your project.
Creating a Build Using Jenkins
Step 1: From the Jenkins interface home, select New Item.
Step 2: Enter the name of the item -we will use the “Hello world” for this demo and select Freestyle project. Click OK.
Step 3: Enter the details of the project you want to
test.
Under the Source Code Management, Enter your repository URL. It is
also possible for you to use a local repository. If your GitHub
repository is private, Jenkins will first validate your login
credentials with GitHub and only then pull the source code from your
GitHub repository.
Step 4: Change the settings under the build section to build the code at the time you want. You can even schedule the build to happen periodically, at set times.
On this configuration page, you also have the option to Add build step to perform extra actions along with the build process, like running scripts.
For example : Click on “Execute Windows batch command” and add the commands you want to execute during the build process.
Here, I have added the java commands to compile the java code.
javac HelloWorld.java
java HelloWorld
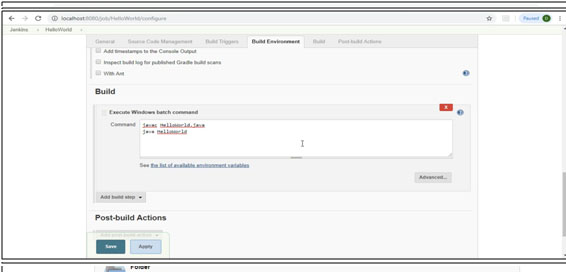
Step 5: Under build, when you have entered all the data, click Apply. Save the project.
Step 6: Click the Build Now button on the left-hand side to build the source code.
Step 7: Click on the build number and then Click on console output to see the status of the build you run. It should show you a success message, provided you have followed the setup properly.
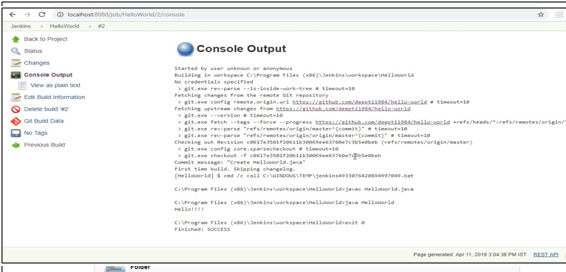
In sum, we have executed a HelloWorld program hosted on GitHub. Jenkin pulls the code from the remote repository and builds continuously at a frequency you define.
Step 8: If you go back to Jenkins home, you’ll see an overview of all projects and their information, including status.
Status of the build is indicated in two ways, by a weather icon and by a colored ball.
- The weather icon shows you a record of multiple builds in one image.
- The sun represents that all of my builds were successful. The color of the ball gives us the status of that particular build, blue colour indicates that the particular build was successful, while red shows failure.
Jenkins Pipeline
A Jenkins pipeline is a series of interlinked events or jobs.
Jenkins Pipeline is a combination of plugins that support the integration and implementation of continuous delivery pipelines using Jenkins.
In a Jenkins pipeline, every job or event has some sort of dependency on at least one or more events.
A continuous delivery pipeline contains a group of states called build, deploy, test and release. These events are interlinked with each other. Every state has its events, which work in a sequence called a continuous delivery pipeline.
A continuous delivery pipeline is an automated expression to display your process for getting software for version control.
Thus, every change made in your software goes through a number of complex processes on its way to being released. It also involves developing the software in a reliable and repeatable manner, and progression of the built software through multiple stages of testing and deployment.
Jenkins pipelines can be defined using a text file called JenkinsFile. You can implement pipeline as code using JenkinsFile, and this can be defined by using a domain specific language (DSL). With JenkinsFile, you can write the steps needed for running a Jenkins pipeline.
The benefits of using JenkinsFile are:
- You can create pipelines automatically for all branches and execute pull requests with just one JenkinsFile.
- You can review your code on the pipeline.
- You can audit your Jenkins pipeline.
- This is the singular source for your pipeline and can be modified by multiple users.
JenkinsFile can be defined by either Web UI or with a JenkinsFile.
Why Use Jenkins Pipeline?
- It is used to know which task Jenkins is currently executing. Often several different changes are made by several developers at once, so it is useful to know which change is getting tested or which change is sitting in the queue or which build is broken. This is where pipeline comes into the picture.
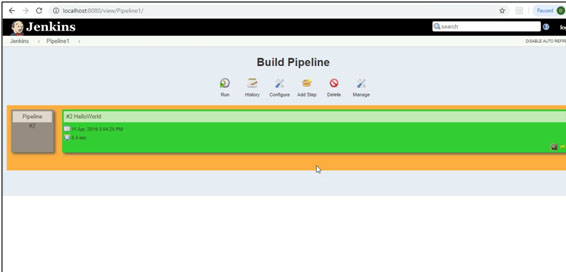
- The pipeline phases can be executed in series or parallel, and if one phase is successful, it automatically moves on to the next phase (hence the relevance of the name “pipeline”).The below image shows how a build Pipeline looks like.
Here are the reasons why you use should use Jenkins pipeline:
- Jenkins pipeline is implemented as a code which allows multiple users to edit and execute the pipeline process.
- Pipelines are robust. So if your server undergoes an unforeseen restart, the pipeline will be automatically resumed.
- You can pause the pipeline process and make it wait to resume until there is an input from the user.
- Jenkins Pipelines support big projects. You can run multiple jobs, and even use pipelines in a loop.
How to Create Jenkins Pipeline
Once you have logged in Jenkins, you will see the dashboard, follow these steps to create a Jenkins pipeline:
- Click on the “+” button on the left-hand side of your Jenkins dashboard to create a pipeline.
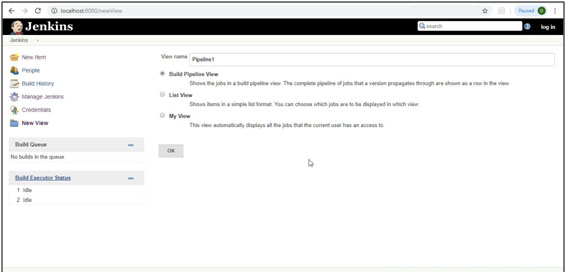
- You will be prompted to give a name to the pipeline view. Please choose a self-explanatory name.
- Select Build a pipeline view under options and click ok.
- On the next page, you will be asked for some more details to configure your Jenkins pipeline. Just accept the default settings, and make sure you choose the first job under the settings.
- Click on Apply and then OK.
Running a Pipeline Build
- For running a pipeline build, you need to chain your jobs first. For this, go to your first job and click on configure.
- Now, under Build Triggers, check the Build after other projects are built option.
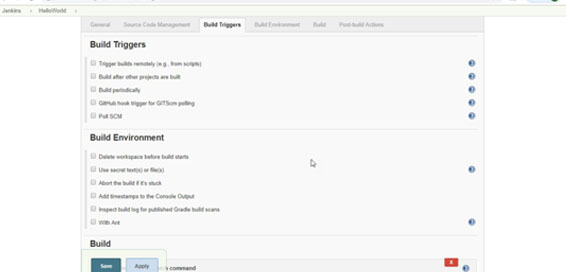
- Thus, a chain for all your jobs has been created.
- Install the Build Pipeline view plugin if you don’t have it already installed.
- With the Build Pipeline plugin, you can create a pipeline view of incoming and outgoing jobs, and create triggers which require manual intervention.
- Go to your Jenkins dashboard and create a view by clicking on the “+” button.
- Select the Build Pipeline View option and click OK.
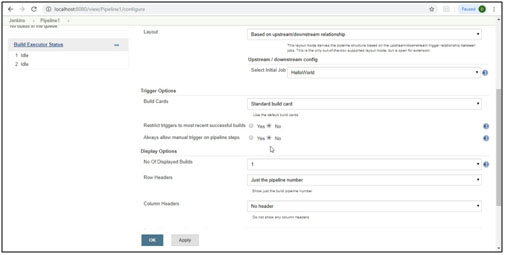
- Under Pipeline view configuration, locate Pipeline Flow.
- Under Pipeline flow, select the initial job to run.
- Now choose the initial job which has chains to other jobs. So, one by one, the jobs will run in the pipeline.
Running Jenkins pipeline
Jenkins Installations
JENKINS INSTALLATION ON WINDOWS
Let us see the process to install Jenkins on Windows.
Step 1:
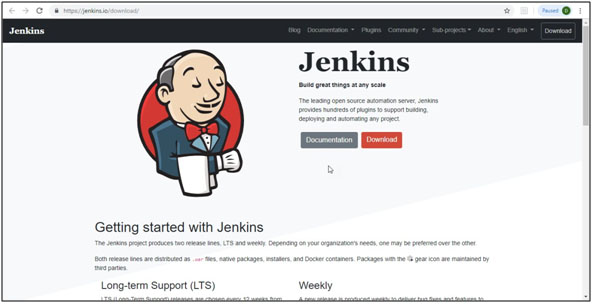
Jenkins Download
Go to the site https://jenkins.io/download/
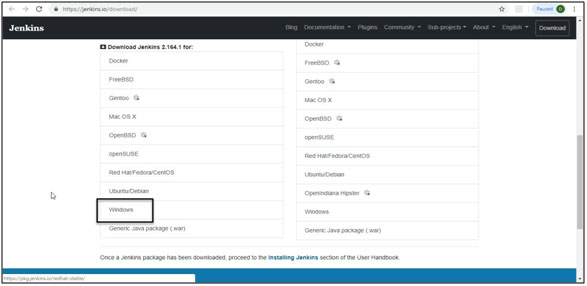
Step 2: Scroll down and click on Windows.
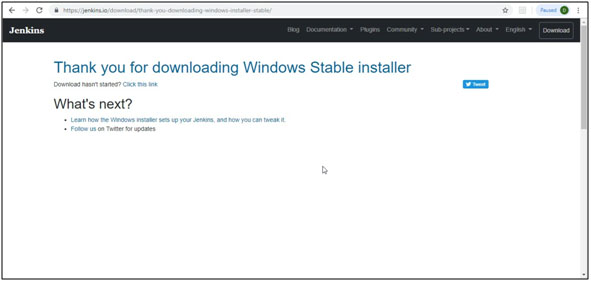
Step 3: You will view this screen and the download will begin.
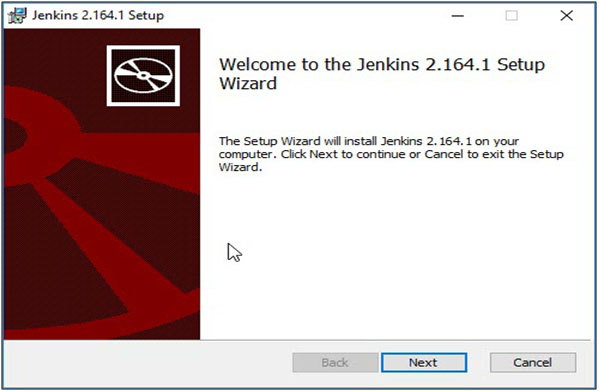
Step 4: The setup popup will appear.
Step 5:
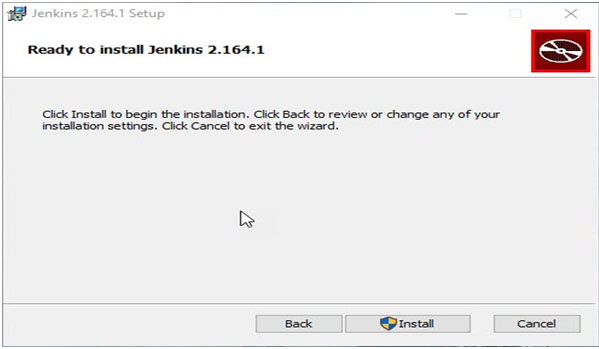
Step 6: Click on the Install button.
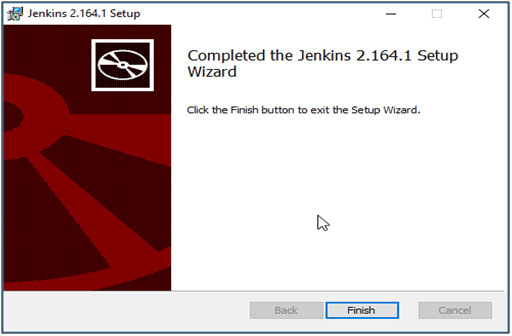
Step 7: the installation completes, click Finish on the last screen.
Step 8: The browser window opens and the below screen appears:
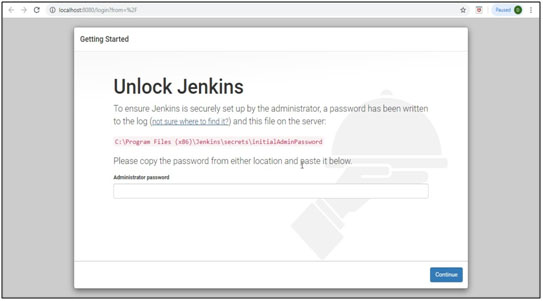
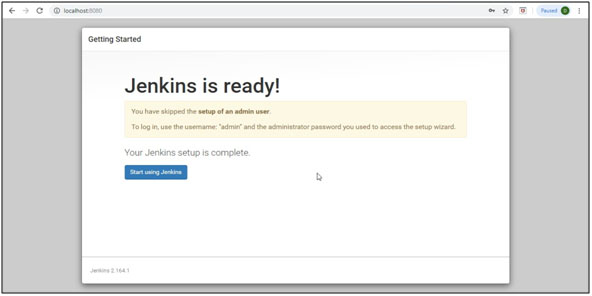
An important thing to remember:
The initial admin password is always stored in a particular file named initialAdminPassword in secrets folder inside the installation folder.
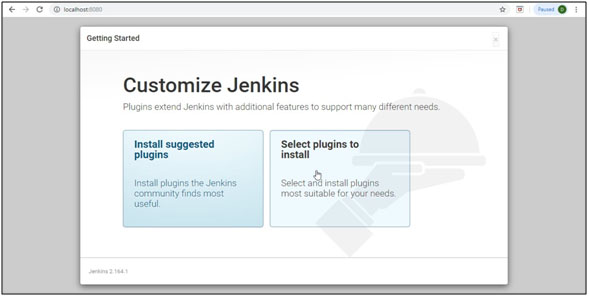
Step 9: Once the password is entered, you reach this screen.
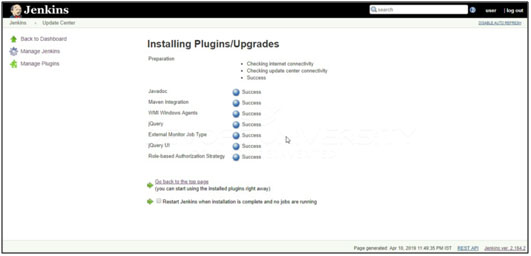
Click on Install suggested plugins. It will install all the important frequently installed plugins for you.
Step 10: As the plugins get installed, you start getting tick marks against the plugin names.
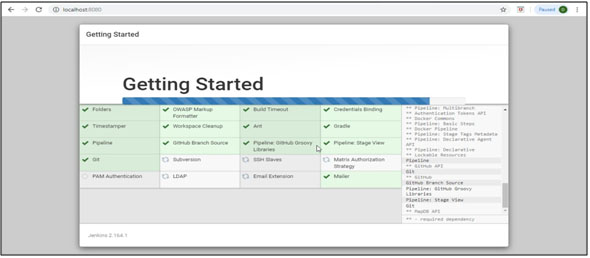
The default version of Jenkins comes with a limited set of features. If you want to integrate your Jenkins installation with version control tools like Git, then you need to install plugins. For integration with tools such as Maven, Amazon EC2, you need to install respective plugins in your Jenkins. Jenkins makes the task easier by installing these suggested plugins in the beginning itself.
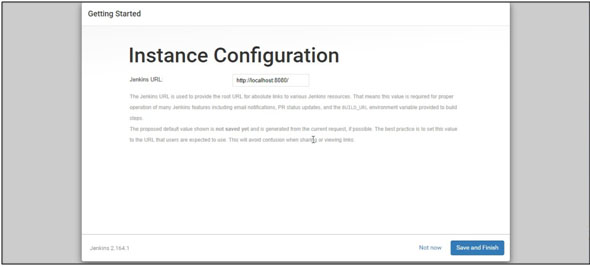
Step 11: You can set the credentials for the first admin user and click the Save and Continue button OR Continue as admin

Step 12: Click Save and Finish button.
Step 13: Jenkins is up and ready!
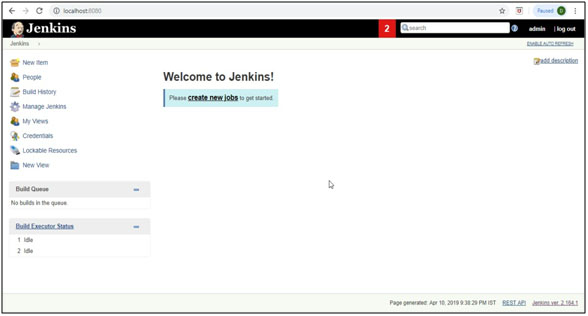
Step 14: You will view the below screen with the dashboard on side.
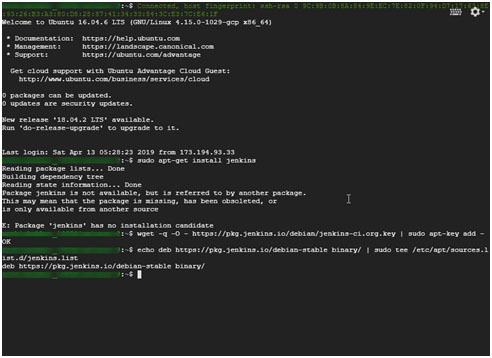
INSTALLATION ON UBUNTU
Let us see the process to install Jenkins on Ubuntu.
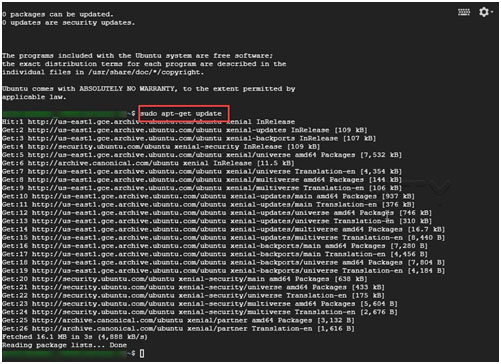
Step 1: Once the Ubuntu VM is up and running, run sudo apt-get update command.
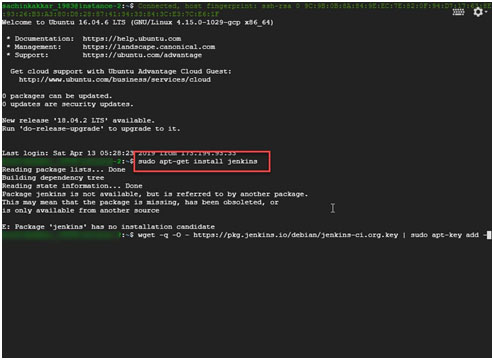
Step 2: Run sudo apt-get install jenkins command.
wget -q -O - https://pkg.jenkins.io/debian-stable/jenkins.io.key | sudo apt-key add -
sudo sh -c 'echo deb https://pkg.jenkins.io/debian-stable binary/ > \
    /etc/apt/sources.list.d/jenkins.list'
sudo apt-get update
sudo apt-get install jenkins
Step 3: Then, run the command shown below:
SUMMARY
In this document, we have tried to cover all the basic concepts of Continuous Integration and the role Jenkins play in the DevOps lifecycle. We also discussed the various CI tools and compared them. We also talked about the build tools and how Jenkins integrates with them.
Later, we explored the Jenkins tool interface in detail and the features like plugins etc. We learnt how to build a Jenkins pipeline and execute it.
We also learnt how to Install Jenkins on Windows and UBuntu VM.
We can build upon this document by installing plugins for tools like Sonarqube and integrate them with Jenkins. We can build elaborate pipelines involving several tools for each stage in the pipeline.
Hope you enjoyed reading this document and found it helpful. Happy learning!

0 Comments